


TOP 10 FREE FILE HOSTING SITES.
Now a days every Internet user wants to share files with friends, colleagues, classmates, family...Read More
TOP 10 COMPUTER MOUSE TIPS.
Until now most computer users don't take full advantage of their computer Mouse's. Below are computer mouse tips and secrets...Read More
VIEW WINDOWS SIDE BY SIDE.
If you're looking for an easy way to divide or split your screen into multiple ...Read More
SETUP WINDOWS 7 AND VISTA FROM USB DRIVE.
i would like to show one of my favorite tutorials i'd learn when i was on college, when ...Read More
Showing posts with label Regedit. Show all posts
Showing posts with label Regedit. Show all posts


DISABLING YOUR DRIVE(partition) ON YOUR COMPUTER.

So Follow below step carefully....
1st: Open ->start menu->run
>Type "regedit.exe"
>Navigate to registry entry HKEY_CURRENT_USER\Software\Microsoft\Windows\ CurrentVersion\Policies\Explorer
2nd: Now in the right pane create a new DWORD item (by rightclicking and new->dword) and name it NoDrives ( case sensitive).
3rd: Now modify it's value by double clicking it and set it to 3FFFFFF (Hexadecimal) .
Restart your computer. Now when you click on My Computer, No drives will be seen.
Reminder:To enable display of your drives in My Computer,
simply delete that DWORD item NoDrives that you created (it can be deleted by navigating to HKEY_CURRENT_USER\Software\ Microsoft\Windows\CurrentVersion\Policies\Explorer and selecting the NoDrives and deleting it..del key...).
Restart your computer and now you can see your drive again..
RENAME YOUR RECYCLE BIN.

How do i rename my recycle bin(where temporarely deleted files are stored)?
there is no option to rename it!
Unless you use this simple method of bypassing registry..
Follow this step:
3)Now, On the Left Hand Side of the Window you'll see a Tree of folders Just DoubleClick on the HKEY_CURRENT_USER folder
6)Goto the Right Hand Side of the Same window and double Click On the Default Option and Write in the name You want for Your Recycle Bin e.g. :- Trash #. CLick O.K. button.
7)Goto Your Desktop and Refresh the Desktop and See the magic*.
Follow this step:
1)Goto 'start' menu and Choose 'Run' command.
2)Type 'regedit' (without inverted commas). U will see Registery Editor Window on your Screen.
2)Type 'regedit' (without inverted commas). U will see Registery Editor Window on your Screen.
3)Now, On the Left Hand Side of the Window you'll see a Tree of folders Just DoubleClick on the HKEY_CURRENT_USER folder
>Now in the new folder Tree DoubleClick on the 'Software' folder
>Then DoubleClick on 'Microsoft' folder
>'Windows' folder
>'Current Version' folder
>'Explorer' folder
>'CLSID' folder.
4)Now, You will see a Tree of 3 or 4 folder(don't worry about the number of folders). Just Click on the folder : '{645FF040-5081-101B-9F08-00AA002F954E}'.
5)Finally, after Clicking on '{645FF040-5081-101B-9F08-00AA002F954E}' folder
4)Now, You will see a Tree of 3 or 4 folder(don't worry about the number of folders). Just Click on the folder : '{645FF040-5081-101B-9F08-00AA002F954E}'.
5)Finally, after Clicking on '{645FF040-5081-101B-9F08-00AA002F954E}' folder
6)Goto the Right Hand Side of the Same window and double Click On the Default Option and Write in the name You want for Your Recycle Bin e.g. :- Trash #. CLick O.K. button.
7)Goto Your Desktop and Refresh the Desktop and See the magic*.
Your Recycle Bin has been Renamed.
BOOT DEFRAGMENT.
 A great new feature in Microsoft Windows is the ability to do a boot defragment.
This places all boot files next to each other on the disk to allow for faster booting.
By default this option is enabled, but on some systems it is not,
So below i will teach you how to turn it on:
So below i will teach you how to turn it on:
-> Go to Start Menu and Click Run >Type in regedit then click ok.
-> Find "HKEY_LOCAL_MACHINESOFTWAREMicrosoftDfrgBootOpt imizeFunction" Select "Enable" from the list on the Right on it and select "Modify"Change the value to Y .
Reboot your Pc and see the change yourself..
MAKE YOUR WINDOWS XP GENUINE.!

Follow this step:
1) start > run > type "regedit" (without the quotes of course)
2) go to the key:HKEY_LOCAL_MACHINE\SOFTWARE\MICROSOFT\Windows NT\CurrentVersion\WPAEvents\OOBETimer...and doubleclick on it.
3) Then change some of the value data to ANYTHING ELSE...delete some, add some letters, I don't care...just change it! Now close out regedit.
4) Go to start > run > "%systemroot%\system32\oobe\msoobe.exe /a" (again, dont type the quotes)
5) The activation screen will come up, click on register over telephone, then click on CHANGE PRODUCT KEY, enter in this key: JG28K-H9Q7X-BH6W4-3PDCQ-6XBFJ.
Now you can download all the updates without activating,
and the Genuine Microsoft Validation thing won't bug you no more!! HAHAHA ( evil laugh )
Works with most WinXP versions though there are some exceptions...
REMOVE SHORTCUTLINK FROM DESKTOP FOLDER...

1) Just go to >start>run>type regedit>goto hkey_classes_root

2) Find a file by name lnkfile click on that
3) To that right u can see a file by name shortcut, delete that.

Then restart the pc and now you cant see the shortcut arrow...
Its recommend to save a checkpoint of system restore on you pc before you take any modification.
MAKE WINDOWS LOG ON MESSAGE
Lets try to modify windows log on message
Follow Below step:
2) In registry editor, Find the following key:
hklm\software\Microsoft\Windows NT\Current version\Winlogon.
3) Right click LegalNoticeCaption,
click modify,
Type: YOUR MESSAGE HERE,and then click ok!
4) Right click legalNoticeText,
click modify, and then Close your message!

5) Restart Your Computer.
6) And the message will appear every time you logon!
6) And the message will appear every time you logon!
Reminder : This trick is not recommended for novice pc users.
DISABLE YOUR CD BURNING.

This trick don't allow user to burn CD's
by disabling the use of the inbuilt CD recording functions of Windows...
1)Open your registry by opening Start menu-> press Run -> type regedit
2) Find this path:
HKEY_CURRENT_USER>Software>Microsoft>Windows>Current Version>Policies>Explorer
and create this key: "NoCDBurning" and set its value to 1.
Close registry and restart your pc for the changes take effect.. :)
ANIMATION ON XP.
Did you know you can turn off window animation ("exploding" windows), displayed when you play around with minimizing/maximizing open windows.This makes navigating Windows 95/98/ME/NT4/2000/XP a lot quicker, especially if you don't have a fast video controller, or if you got tired of seeing it all the time (like I did)
To do this,
-Run Regedit (or Regedt32) and go to: HKEY_CURRENT_USER\Control Panel\Desktop\WindowMetrics
To do this,
-Run Regedit (or Regedt32) and go to: HKEY_CURRENT_USER\Control Panel\Desktop\WindowMetrics
-Or if you are the only user of your Windows computer go to: HKEY_USERS .Default Control Panel Desktop\WindowMetrics Right-click on an empty spot in the right hand pane.
-Select New -> String [REG_SZ] Value. Name it MinAnimate. Click OK. Double-click on "MinAnimate" and type 0 to turn OFF window animation or type 1 to turn it ON. Click OK.
-Select New -> String [REG_SZ] Value. Name it MinAnimate. Click OK. Double-click on "MinAnimate" and type 0 to turn OFF window animation or type 1 to turn it ON. Click OK.
Close the Registry Editor and restart Windows. Finish
REMOVE YOUR SHUTDOWN BUTTON..
To remove the shutdown button from the logon screen in WinXP and 2000,
1) Just goto->
START-> RUN-> type Regedit
2) Use regedit and navigate to the following key: HKEY_LOCAL_MACHINE\SOFTWARE\Microsoft\Windows\CurrentVersion\policies\system change the value of the dword 'shutdownwithoutlogon' to '0'.


And then exit regedit.
1) Just goto->
START-> RUN-> type Regedit
2) Use regedit and navigate to the following key: HKEY_LOCAL_MACHINE\SOFTWARE\Microsoft\Windows\CurrentVersion\policies\system change the value of the dword 'shutdownwithoutlogon' to '0'.

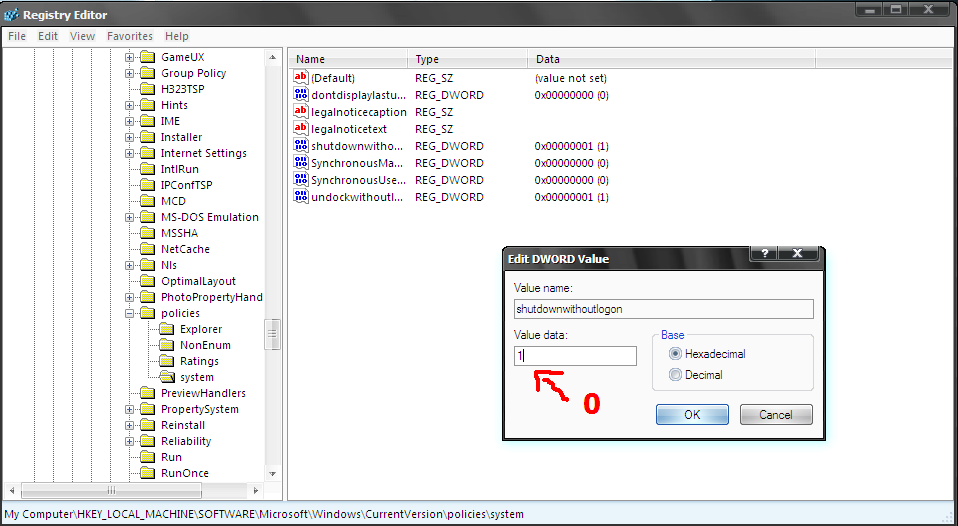
And then exit regedit.


